Installation of Grid-Connected Solar PV Systems
Welcome to the world of solar renewable energy! At AUSINET, we specialise in training electricians in the growing field of solar energy. Whether you’re a student, a newbie, or someone aspiring to upskill yourself, this guide will walk you through the steps involved in the design and installation of grid-connected solar systems for Australian premises.
Important: Only an accredited, licenced electrician can install a solar system, and the installation must comply with the Distribution Network Service Provider’s (DNSP) requirements. To become accredited, a licenced electrician must complete a relevant training course, and to choose a suitable course, you can enrol in our solar design and installation course in Brisbane to gain the necessary accreditation.
Executive Summary: Installation of Grid-Connected Solar Systems
This technical guide provides a structured roadmap for accredited electricians to master the design and execution of grid-connected solar PV systems in accordance with Australian regulatory frameworks.
- Safety Protocols: Critical focus on fall protection, DC isolation, and PPE per AS/NZS 3000.
- Site Analysis: Utilising Pylon or OpenSolar for shading, roof integrity, and irradiance audits.
- Regulatory Approvals: Navigating DNSP pre-approvals and smart meter requirements to secure STC eligibility.
- System Architecture: Selecting CEC-approved modules, inverters, and mounting frames (AS/NZS 1170.2).
- Electrical Integration: Precision string wiring, MPPT voltage matching, and AC/DC protection.
- Commissioning: Final testing and grid-synchronisation protocols following Australian Standards.
Target Outcome: To equip solar technicians with the proficiency to deliver safe, high-yield renewable energy solutions that meet Solar Accreditation Australia (SAA) accreditation standards.
Health and Safety Requirements
Health and safety in solar installation is crucial to ensure that workers and the surrounding environment are protected during the process. By adhering to strict safety standards and using proper protective measures, the risks associated with solar panel installation can be minimised, ensuring a safe and successful installation process. Here are some key aspects to consider:
- Electrical Safety: Solar panel systems involve electrical components, so workers must be aware of the risks related to live wires and the potential for electrical shock. Proper insulation, grounding, and power disconnection before installation are essential.
- Fall Protection: Since solar installations often take place on rooftops, workers must use fall protection equipment, such as harnesses, guardrails, and ladders, to prevent injuries from falling.
- Personal Protective Equipment (PPE): Installers should wear appropriate PPE, including hard hats, gloves, safety goggles, and protective footwear, to minimise exposure to hazards such as falling debris or sharp objects.
- Lifting and Handling: Solar panels and related equipment can be heavy, so proper lifting techniques and teamwork are required to avoid strain or injury. Mechanical lifting devices may be used for heavy panels.
- Weather Conditions: Installations should be done in suitable weather conditions. Extreme heat, rain, or high winds can increase the risk of accidents. Workers should avoid working in unsafe conditions.
- Training and Certification: Installers should be trained and certified to handle the technical and safety aspects of solar system installation. Ongoing training ensures they are up-to-date with safety protocols and new technologies.
- Fire Safety: Since solar installations involve electrical components, the risk of fire, although rare, can be present. Installers should ensure that wiring is properly insulated and that fire extinguishers are readily available on-site.
1. Components of a grid-connected solar PV system
Typical Components of roof-mounted solar systems are:
- A PV array(a bunch of panels) is usually mounted on the roof.
- Mounting systems such as PV frames or rails
- PVC conduits
- Isolation devices such as Isolators
- Inverter(s)
- Switchboard
- Safety devices such as Circuit breakers and fuses
- AC and DC Cables

2. Getting Started, Initial Consultation:
A good and compliant solar installation begins with understanding the client’s needs and knowledge of local rules and regulations. This starts with assessing the client’s energy requirements, budget and preferences. Gather basic information about the property, such as:
- Past electricity bills,
- Number of people living at the property,
- Types of heavy loads such as pools, air conditioners, hot water systems, etc
- Location of electricity connection, e.g. meter box and switchboard
- Type of roof, such as tin or tiled.

3. Exploring the Site:
A detailed site survey is essential to determine the best spot for solar panels. This includes:
- Physical Inspection: Check the roof or ground area where the panels will go.
- Roof Condition Check: Ensure the roof is strong enough to support the solar panels and mounting equipment.
- Shading Analysis: Identify anything that might cast shadows on the panels using tools like solar pathfinders or design software such as Pylon.

4. Taking Measurements and Gathering Data:
Accurate measurements and data are crucial for designing an efficient solar system:
- Roof Measurements: Measure the available roof space, noting the tilt angle and direction.
- Sun Exposure Assessment: Study the sun’s path to find the best placement and angle for the panels. In Australia, solar panels should face north to achieve optimum solar irradiance. If panels are going on the roof it is possible that the north-facing roof face may not be available or might not be big enough to accommodate all panels. In this case, East and West faces can be used as well. Avoid putting any panels on the south side of the roof.
- Inspecting existing electrical infrastructure: Check whether the existing electrical system requires upgrades such as switchboard upgrades to accommodate circuit breakers and meters for the solar inverter.

5. Estimate System Size and Proposal:
Based on the property’s energy usage in the previous steps, calculate the solar system’s size. This task is crucial, and it is advised to use assessment tools such as Pylon, OpenSolar, etc. These tools let you take a satellite image of the property, create panel layouts and estimate system output. This will help you find out how many panels you would need to fulfil the need and how many can be installed. These tools can also be used to add system costs, create invoices, add incentives or rebates and generate a design proposal for the customer with all the information in a formal and presentable format. This proposal also contains generation graphs and payback period calculations, which help the customers to understand how much they will save and how long it will take for their system to pay back the initial cost the owner has spent on the system.
6. Getting Approvals and Permits:
Ensure the proposed system meets local building codes, electricity network requirements and electrical standards. Submit applications for the necessary permits and approvals from local authorities and network distributors.
7. Setting Up the Mounting System:
- PV frames must also be approved to be installed for the wind region of the installation.
- Follow the manufacturer’s installation instructions.
- Leave enough clearance from the gutter and ends of the roofs. Check the installation manual and the certificate from the structural engineer.
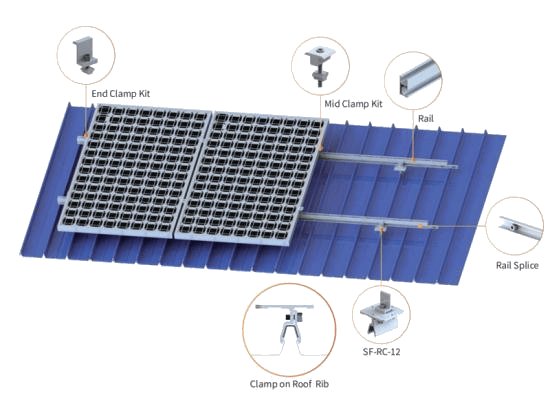
Installation on tiled roofs
The mounting structure should be attached to a tiled roof using suitable tile hooks, which are placed underneath the tile to connect to the roof trusses below.


8. Installing the Solar Panels:
After the mounting system is secured to the roof or ground start attaching solar panels to the mounting system. Refer to the mounting system installation manual to see installation instructions. Clenergy is the most popular brand in Australia. Keep in mind to leave clearances around the edges of the roof.

9. Wiring and Electrical Connections:
Every panel comes with a pair of cables with MC4 connectors, a positive and a negative. A positive connector will connect to the negative of the next panel. This is called a series connection or a string of panels. But you can only connect a certain number of panels in a series before the net voltage goes above the inverter’s MPPT input voltage ratings. The rest of the panels can be in another string. A typical residential 6.6kW (440W x 15 panels) system would have two strings. This involves running cables and making electrical connections.

As an example, completed roof work should look like this.

10. Installing the Inverter:
The inverter converts the direct current (DC) produced by the panels into alternating current (AC) for use or grid feed. The strings created in the previous step on the roof are then connected to the Inverter MPPTs using MC4 connectors. The inverter AC output is then connected to the switchboard using a suitably rated cable and a circuit breaker. The size of the cable would depend on the size of the inverter (the current output of the inverter).

The following picture shows typical connections of a grid-connected inverter to the main switchboard.

11. Testing and Commissioning:
Thoroughly test the system to ensure it works correctly and safely. This includes checking electrical connections, inverter operation, and overall performance. The system can not be turned on yet until the network approves the connection application.
12. Final Approval:
After getting approval from the electricity network, which may involve replacing the old electricity meter with a new smart meter, the system can be turned on. Turning the system on without getting approval may disqualify the client from feedback incentives into the grid or even a non-compliant installation.
13. Residential vs. Commercial Grid-Connected Solar Systems
1. Scale and Capacity
- Residential: Smaller systems (3kW to 10kW) focused on meeting a single household’s energy needs.
- Commercial: Larger systems (often 100kW+) designed to meet the energy demands of businesses or office buildings such as schools, shopping centres, etc.
2. Roof Space and Structural Considerations
- Residential: Limited roof space and varying roof types require careful planning.
- Commercial: Larger, flat roofs provide more space but require detailed structural assessments due to their larger system size.
These are costs associated with managing taxes, accounting services, or any legal fees for contracts or disputes. Allocating $2 – $5 per hour helps cover these.
3. Energy Consumption Patterns
- Residential: Lower and more predictable energy usage, mainly in the evenings and mornings.
- Commercial: Higher and more consistent energy consumption throughout the business day.
4. Regulatory and Financial Incentives
- Residential: Homeowners may benefit from government incentives, rebates, and feed-in tariffs.
- Commercial: Businesses can use tax incentives, grants, and accelerated depreciation.
14. Australian Standards and Regulations

There are a range of Australian standards and industry regulations that solar technicians must follow to have a compliant installation and benefit from government incentives such as STCs.
- All solar technicians need to be SAA accredited; refer to the SAAs website here.
- AS/NZS 3000: All electrical wiring and equipment installation needs to be in line with this standard.
- AS/NZS 5033: This standard outlines installation and safety requirements for photovoltaic (PV) arrays.
- AS/NZS 4777.2. All grid-connected inverters in Australia need to comply with this standard. In Australia, CEC approves inverters; check a list of approved inverters on CEC’s website here.
- All solar panels to be installed in Australia need to be on CEC’s approved list of panels. You can access a list of approved panels here.
- .AS/NZS 4777.1 outlines requirements for inverter connection with the switchboard.
- AS/NZS 1170.2: All solar frames, rails and related equipment need to comply with this standard. Common Smart Inverter Profile (CSIP-Aus): Inverters must comply with CSIP-Aus guidelines to effectively manage energy exports.Solar Backstop: Some networks require the installation of a backstop device to control export. Pre-Approval Process: Almost all networks require a connection application to get approval for solar connection. Submit a pre-approval application to the local utility company to ensure a compliant grid connection.
Conclusion
The solar industry in Australia is experiencing rapid growth, driven by increasing demand for renewable energy. The surge in electric vehicle (EV) adoption is further accelerating the need for on-site solar solutions, as more EV owners seek to install charging stations powered by solar energy. As a result, the demand for skilled solar technicians is expected to rise significantly in the coming years. With energy costs climbing and environmental concerns at the forefront, more households and businesses are turning to solar as a cost-effective and sustainable alternative. This transition is further supported by the Australian government’s generous renewable energy rebates, designed to accelerate the shift toward clean energy.
Installing grid-connected solar systems involves careful planning, design, and execution. You can ensure successful and efficient installations by following these steps and adhering to local regulations. At AUSINET, we provide specialised electrical courses and solar training programs to equip you with the skills needed to excel in the solar industry.
Are you ready to start your career in solar installations? Visit our website to learn more about our courses and training programs. Click here to view solar courses and pathways.
Last reviewed date: 02/04/2026

Electrical Risk Management: Identifying Hazards, Assessing Risks and Applying Control Measures
Electrical Risk Management: Identifying Hazards, Assessing Risks and Applying Control Measures An el…

How to Become an Electrician in Australia (2026 Complete Guide)
How to Become an Electrician in Australia (2026 Complete Guide) An electrician installs, tests, main…

What Is UEE40420? A Complete 2026 Guide to the Certificate IV in Electrical Instrumentation
What Is UEE40420? A Complete 2026 Guide to the Certificate IV in Electrical Instrumentation UEE40420…
Leave a Reply